fbpx
Category

Yogis in the Kitchen

Yogis in the Kitchen: Bone Broth

By Yoga, Yogis in the Kitchen

Bone Broth_Blog Image

Bone Broth is all the rage right now. Touted for its many nutritional benefits, bone broth was once relatively difficult to buy commercially (you would have to go to your butcher or perhaps your neighborhood health food store). Now it is becoming more and more main stream. Recently, I even saw bone broth cartridges for a Keurig. Go figure.

But all of these commercial options have one thing in common – they are expensive. Here is a little secret that the bone broth marketers don’t want you to know……bone broth is SUPER easy to make at home. This is awesome news! Now we don’t have to choose between new yoga pants and fancy bone broth. We can have both. Yassssssss.

The What & The Why

Before we get into the “how,” let’s talk a little bit about the “what” and the “why.”

Bone Broth is really just the fancy-super-food word for stock or broth – the only difference is that it has been cooked for a long time. The extended cooking time increases the nutrient density of the stock by allowing more time for all of the “good stuff” to get cooked out of the bones. What is the good stuff? Protein. Gelatin. Collagen. Minerals (including Calcium). The other bonus, the longer you cook your stock, the more flavorful and rich it becomes. Yum.

In the past, most traditional kitchens had a continuous pot of stock simmering on the stove, and this continuously cooking liquid was used in much of the household cooking, essentially providing a liquid multivitamin and flavor injection into daily meals.

Once you learn how easy it is to make your own bone broth at home, you too can benefit from this same nutrition and flavor injection in your meals.

Bone broth isn’t just great for soup (which, of course, it is), it is also can be used for lots of other things – like to make grains (rice, quinoa, etc.) or in place of milk/cream in mashed potatoes…..really, it can be used as a replacement for the liquid in pretty much any savory dish. It can even be enjoyed plain, as a soothing nutritious hot beverage for a cold day.

The How

Bone broth is ridiculously easy to make. It is pretty much a bunch of bones and veggie scraps boiled in a pot for a long time. Done. Okay…..here are a few more details for those of you that want a “recipe.”

Ingredients

  • Bones (duh): Every time I roast a chicken or buy a rotisserie chicken from the grocery store, I throw the bones in a freezer bag and stash it in the freezer. That way I always have some chicken bones on hand to make broth. (Side Note: If you are going to make bone broth out of beef soup bones, or any bones with a significant amount of marrow, I would recommend pre-roasting the bones before boiling them. This additional step does actually improve the flavor of the resultant broth. Personally, I have not found much flavor difference between roasted and non-roasted poultry bones – chicken and turkey).
  • Veggie Scraps: I do the same freezer bag trick with appropriate vegetable scraps (the ends of onions, carrot peelings, the butts of celery stalks….any veggie that I think would be good in the flavor profile of my bone broth). I always have a couple of freezer bags of chicken bones and veggie scraps going at any given time.
  • Apple Cider Vinegar (splash – optional)
  • Salt & Pepper (to taste)
  • Garlic cloves (optional)
  • Any other junk you want to throw in there. Experiment!
    • Optional Add-Ins: Want more Collagen? Add some additional chicken wings or use a higher bone/water ratio.

Cooking Methods

Instapot: The Instapot is BY FAR my favorite way to make bone broth. If you do not own an Instapot, I highly recommend it. An Instapot is an electric pressure cooker that is like a magical pot of awesome-ness. It is seriously my favorite appliance. I use mine about 90% of the time just to make bone broth, but it also can cook frozen chicken in less than an hour. WHAT?!?! Throw your bones (the bones of 1-2 chickens – I lean towards 2) into the pot with your veggies scraps, cover with water, add additional spices & vinegar. Turn on that sucker. And cook for 2 hours. Boom. That’s it. 

Crock Pot: No Instapot? A Crock Pot is your next best bet. I cooked bone broth in a Crock Pot for many years, until I finally invested in my Instapot. Same instructions as above, but let your broth cook overnight. I would usually start my broth on high, let it cook like that for at least an hour, and then turn it to low when I went to bed. Wake up. Boom. Bone broth.

Stovetop: You can always go the traditional way and cook your bone broth on the stovetop. You will need a big heavy-duty stock pot and a day at home. This method is actually super nice on a lazy Saturday when you are going to spend the day cooking and doing other “home stuff.” Same instructions as above. Simmer on low/medium for the whole damn day.

COOKING TIMES: Cooking bone broth is not an exact science, and in fact, it is pretty hard to screw it up. The only time I have ever “overcooked’ my bone broth was in my Instapot (when I first got it), and I think what happened with that is that I cooked it so long that the chicken bones started to disintegrate to the marrow, which dramatically changed the flavor from what I was used to…… But if you are not using an Instapot, it is pretty hard to overcook your bone broth.

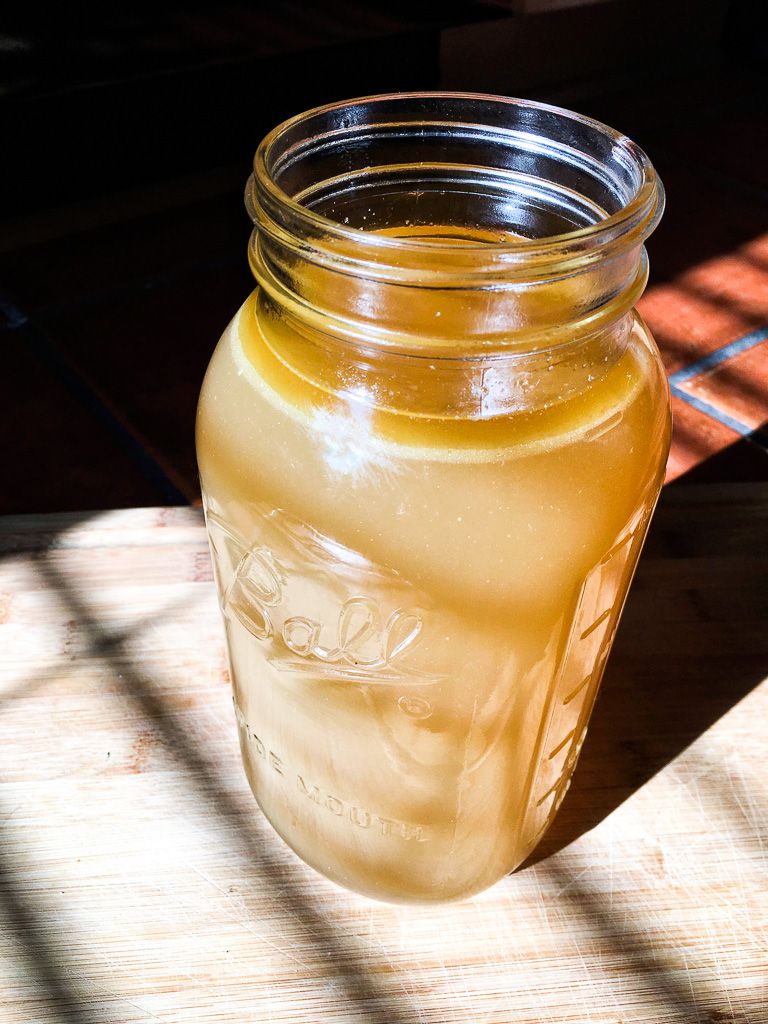
STRAINING & STORAGE: Once you have cooked your bone broth, you will need to strain it. I like to use a fine metal colander. The fat content of your broth will depend on the fat content of your bones/scrap material. If your broth is fatty, cooling it overnight in the fridge will allow you to skim the fat from the top of the broth.

A NOTE ON CONSISTENCY: Really great bone broth will be gelatinous when refrigerated. If yours isn’t – don’t freak out, it’s cool. You just made some really yummy chicken stock. Keep experimenting with your bone/water ratio and cooking time until you get your broth to the consistency that you like.

A NOTE ON VEGETABLES: You can really use any veggies you like in your bone broth, but in my experience some veggies have a very strong and specific flavor that can overwhelm the flavor of your broth (ie: leeks, peppers, fennel, etc.). It is all a big experiment and everyone has different preferences, but remember, you will be cooking the crap out of your broth, so a little can go a long way.

So, in conclusion, experiment, have fun….and don’t spend a bazillion dollars on 8 ounces of fancy bone broth in a frozen pouch (unless, of course, you want to ???? ). 

Yogis in the Kitchen: Energy Bites

By Yoga, Yogis in the Kitchen

IMG_3862

Yay FALL!!!

Fall means running around – work, yoga, football, kid stuff, meetings…all the things.

For high energy people, sometimes you need a quick little bite to help you get through the hustle and bustle of your day.

These Energy Bites are nutritious, (a little too) delicious, and can be prepped ahead of time for a mid-day (pre-yoga?) snack.

Here’s what you need:

  • Peanut Butter
  • Coconut Shreds
  • Rolled Oats
  • Minced Nuts
  • Honey
  • Vanilla
  • Chocolate Chips

IMG_3836

IMG_3841-2

Combine in food processor:

  • 1/2 cup Peanut Butter
  • 1/3 cup Coconut Shreds
  • 1/3 cup Rolled Oats
  • 1/3 cup Minced Nuts
  • 1/4 cup Honey
  • 1 teaspoon Vanilla
  • Hand full of Chocolate Chips

IMG_3845

Mix everything together in a food processor blend until sticky.

IMG_3852

Then, start rolling into little balls of energy!

IMG_3856

Boom. Pop them in the fridge for an hour or two and enjoy!

IMG_3862

Yogis in the Kitchen: Pumpkin Spice Everything

By Yogis in the Kitchen

You cannot escape it. It is here. Pumpkin spice season. You cannot avoid it…..so, let’s EMBRACE the PUMPKIN SPICE SEASON!!! Here are ALL. THE. PUMPKIN. SPICE. THINGS. Natural, delicious pumpkin spice recipes, made with (gasp) actual pumpkins.

Get ready for PUMPKIN EVERYTHING YA’LL!

IMG_3729

Pumpkin Bread

Ingredients

  • 1 cup flour
  • 3/4 cup whole wheat flour
  • 1 cup dark brown sugar
  • 1 teaspoon baking soda
  • 1 teaspoon baking powder
  • 1/2 teaspoon salt
  • 1/2 teaspoon nutmeg
  • 1/2 teaspoon cinnamon
  • 1/2 teaspoon allspice
  • 1/4 teaspoon ground clove
  • 1 cup pumpkin pie purée
  • 1/2 cup vegetable oil
  • 3 tablespoons maple syrup
  • 2 eggs

Directions

  1. Mix eggs, sugar, oil, pumpkin and maple syrup.
  2. Combine the dry ingredients, mix together until blended and try not to over mix.
  3. Put in greased 8 x 4 loaf pan, bake at 350° for 50 –  60 minutes. Use a toothpick to check in the center to make sure it’s done, leave in the pan for at least an hour to cool.
  4. Once cool, top with Pumpkin Frosting. 🙂

IMG_3742

Pumpkin Frosting

Ingredients

  • 8 oz. cream cheese (softened)
  • 1 & 1/2 cups powdered sugar
  • 1/2 tsp pumpkin pie spices
  • 3 Tbsp pumpkin pie purée
  • 1 teaspoon vanilla extract

Directions

  • Blend and refrigerate until you’re ready to spread on Pumpkin Bread.

DIY PSL Coffee

Ingredients

  • Almond milk (pick your favorite milk of choice)
  • Ground nutmeg
  • Clove
  • Cinnamon
  • Ginger
  • Vanilla extract
  • Add to your favorite coffee!

PSL Frozen Treat

Ingredients

  • Coconut ice cream
  • Pumpkin purée
  • Almond milk (just a splash)

Directions

Blend and top with whip cream caramel and cinnamon chips!

IMG_3746

PSL Shots

Ingredients

  • About 1/2 tsp pumpkin purée
  • Non-alcoholic ginger beer
  • Whip cream
  • Dash of pumpkin pie spice
  • optional: vodka/rum 😉

Directions

Mix all ingredients. Add whip cream last!


Yogis in the Kitchen: Picnic Edition

By Yogis in the Kitchen


Yogis in the kitchen picnic edition

We love dining al fresco. That is fancy-pants-speak for “outside”. 🙂 Grab a blanket and your grub and head outside to enjoy the last weeks of Michigan Summer. Here are some tasty (and healthy) picnic ideas from our Yogis in the Kitchen.

What you’ll need:

  • Picnic Basket 🙂
  • Towel/Blanket
  • Plates, Silverware, Napkins
  • Your favorite beverage – we went with Bloom Ferments Kombucha cause we LAHHVEEE it
  • A delicious sandwich (recipe below)
  • Bomb-a$$ Potato Salad (recipe below)
  • Bag of your favorite popcorn

Yogis in the kitchen picnic edition

Grilled Veggie Sandwich

Makes 4 Sandwiches

Ingredients

  • 1 loaf of french bread
  • Grilled summer squash
  • Grilled zucchini
  • Grilled red pepper
  • Optional – Add a layer of your favorite hummus, some greens, cucumber, basil, fresh mozzarella, thinly sliced shallots or red onion, and top it all off with balsamic vinegar glaze.

Instructions

  1. Cut bread in half and toast for 5 minutes at 350°, let cool
  2. Grill the veggies for just a few minutes (with Extra Virgin Olive Oil, Salt, Pepper) get the grill marks and then let cool after
  3. Once everything is cool build your sandwiches
  4. Secure with toothpicks, cut to size and tightly wrap in parchment paper* for your outdoor enjoyment.

*Pro Tip: Wrap your sandwich in parchment paper to hold the filling together while in transit. 😉

Yogis in the kitchen picnic edition grilled veggie sandwich potato salad

Now onto the Potato Salad…

Seriously. A Potato Salad sans MAYO? Believe it!

Yogis in the kitchen picnic edition potato salad

Homemade Potato Salad (No Mayo)

Ingredients

  • 1.5 lbs petite yellow potatoes

Dressing

  • 1 lemon juiced
  • 1 tsp minced garlic
  • A pinch of red pepper flakes
  • 1 bunch of green onion
  • 1 bunch of parsley
  • 1 bunch of dill
  • 1/4 cup extra virgin olive oil
  • 2 tablespoons Dijon mustard
  • Salt & pepper to taste

Instructions

  1. Chop and boil potatoes until just soft
  2. Mix up the dressing and toss over potatoes
  3. Refrigerate and serve!

And last but not least…don’t forget the BOOCH! #webeboochin

Yogis in the kitchen picnic edition bloom ferments kombucha

ENJOY!

Yogis in the Kitchen: Grilled Fruit

By Yogis in the Kitchen

Untitled design

Grilled Fruit with Coconut Whipped Cream #deliciousness

It’s mid-July and it’s hot as shiz outside.

How does one satisfy their sweet tooth when it’s wayyyy too hot for an oven-baked dessert?

Easy. Get your grill out and try Christina’s Grilled Fruit with Coconut Cream deliciousness

For the Coconut Whipped Cream:

Ingredients:

  • 1 14-ounce can coconut cream
  • 1/4 – 3/4 cup powdered sugar
  • 1/2 tsp vanilla extract

Instructions:

  1. Refrigerate can of coconut cream overnight (or 8 hours)
  2. Place metal mixing bowl and beaters in the refrigerator or freezer 10 minutes before whipping
  3. Open can of coconut cream (make sure you don’t shake it.) Scoop out coconut cream solids into your chilled mixing bowl. Reserve remaining liquid for another use.
  4. Beat coconut cream for about 30 seconds with a mixer until creamy. Then add vanilla extract and powdered sugar and mix until creamy and smooth (about 1 minute). Taste and add more sugar or vanilla if needed!
  5. Serve immediately. If you must store it, refrigerate in a glass container or Mason jar for up to 3 days. Shake or whisk gently to fluff the cream again before serving.

IMG_3640

Tribe_Grilled-Veggies-768x512

#sizzle

Tips for Grilling Fruit:

  1. Our favorite fruits for grilling: watermelon, pineapple, apples, peaches, plumbs and pears.
  2. You want your fruit ripe, but not TOO ripe. Grill fruit right before you’d normally eat it.
  3. Cut fruit into large chunks to keep it from falling between the bars of the grill grate.
  4. Brush fruit with a high-heat, neutral oil. Melted unsalted butter or clarified butter also works well.
  5. Grill fruit over high heat for 3 minutes without moving or turning it to get the perfect sear aka GRILL MARKS. Flip and cook for 1 – 3 minutes more.

IMG_3645

#grillmarks

Grilled-Fruit-Spoonful-768x432

THANKS CHRISTINA! 🙂

IMG_3660

Yogis in the Kitchen: Beet & Bean Burgers

By Yogis in the Kitchen

Summer means GRILL SEASON!! Nom. Nom. Nom.

DSC_8654

Tired of your regular-old-veggie-burger (yawn)?!?!? Well worry not! We’ve got you covered for BBQ season with a couple GRILLABLE veggie burger recipes. Yes, grillable—believe it!

Beet & Black Bean Burgers

Vegan Black Bean and Oat Burger (Egg Free)

Yields: About 4 burgers

Ingredients

  • 1 (15oz) can of black beans, drained not rinsed* (leftover liquid will be your binding agent!)
  • 3/4 cup old fashioned oats
  • 1 tsp tamari or soy sauce
  • 1 Tbsp chili powder (I use Chili 9000 by Penzeys Spices)
  • salt & pepper to taste

Instructions

For all you nerdy foodies, there is no need for an egg to keep your burger together. Meet your new best friend and binding agent, AQUAFABA*.  Aquafaba is just fancy-pants word for the leftover liquid from the beans, it has the same binding abilities as eggs! Boom. You sound cool AND your veggie burgers don’t fall apart on the grill. You’re welcome.

  1. In a food processor add everything but the oats, blend until most of the beans are smashed.
  2. In a mixing bowl, add the oats to the bean mixture. Mix them up, then let the mixture rest for around 5 minutes.
  3. Make your 4 patties. Once formed, let the patties rest for a few minutes on parchment paper. You should be able to pick them up with your hands and not have them fall apart or stick to your hands before you put them on the grill.
  4. Brush your grills surface with oil to ease cooking. Grill well on medium heat about 4-5 minutes on each side.
  5. Just like a meat burger, don’t push the patties down. Once they are on the grill, don’t move them until your ready to flip them.

Beet & Bean Burgers

Those grill marks! #grillboss

DSC_8662

Beet and Bean Burger

Yields: About 6 burgers

Ingredients

  • 1 (15oz) can of garbanzo beans rinsed and drained
  • 1 1/2 Tbsp sweet curry powder
  • 1/2 tsp salt & pepper
  • 2 Eggs
  • 1/2 cup old fashioned oats
  • 1/2 cup Panko breadcrumbs
  • 1 cup shredded beets

Instructions

  1. In a food processor add beans until most are smashed (you can also use a blender or by hand).
  2. In a mixing bowl combine beans and the rest of the ingredients. Let sit for about 5 minutes.
  3. Make your patties, let them rest for about another 5 minutes on parchment paper.
  4. Brush your grills surface with oil to ease cooking. Grill well on medium heat about 4-5 minutes on each side.
  5. Just like a meat burger, don’t push the patties down. Once they are on the grill, don’t move them until your ready to flip them.

Beet & Bean Burgers

The freshest topping for your veggie burgs.

topping ingredients

The Toppings

Ingredients:

  • 1 mango
  • 1 avocado
  • 1 jalapeño
  • 1 tomato
  • lime juice
  • salt & pepper to taste

Chop and dice, combine in bowl, place on burger.

From my grill to yours!

—Christina

Yogis in the Kitchen: Fruit-Infused Water

By Yogis in the Kitchen

First thing’s first: making fruit-infused water is EASY and will make you look like a baller. 1,000%!

Fruit-infused water studio

But, more importantly IT TASTES AWESOME, replenishes you AND looks really pretty! Here are a few ideas to get your creative juices flowing:

watermelon infused water

Cucumber, Watermelon, Mint Coconut Drank

  • Cucumber
  • Watermelon
  • Mint Leaves
  • Coconut Water

fancy water ingredients

Sparkling Mango, Lime, Pineapple Drank

  • Mango
  • Lime/Lemon
  • Pineapple
  • Mango La Croix

Fancy Waters

Sparkling Blood Orange, Nectarine, Tangerine

  • Blood Orange
  • Nectarine
  • Tangerine
  • Sparkling Water

Boom. Easy. Do it.

Yogis in the Kitchen: Grilled Buffalo Cauliflower Salad

By Healthy Living, Yogis in the Kitchen

grilled buffalo cauliflower

Grilled Buffalo Cauliflower (Salad)

If you have not had Grilled Buffalo Cauliflower…..where have you been?!?!? It is SO amazingly delish. Have it by itself, have it on a salad….pretty much just EAT IT. Nom nom nom. #grillseason

Step 1: Make the tasty delish Buffalo Sauce

  • 1/2 cup Franks RedHot Buffalo Sauce
  • 1/3 cup butter (or butter alternative)
  • 1/2 tbsp minced garlic
  • 1 tbsp vinegar
  • Salt & pepper to taste

Mix all ingredients together and heat in sauce pan until bubbly. Set half aside for later.

Grilled Buffalo Cauliflower

Step 2: Roast the Cauliflower

  1. Cut cauliflower in big chunks and put in a Ziploc bag along with half the Buffalo sauce.
  2. Gently massage/toss the cauliflower to let it soak up the sauce for 15 minutes or longer.
  3. Heat your grill to medium high heat, grill the cauliflower for about 20 minutes (turn every five or so minutes.)
  4. Remove from heat and immediately put in a container with a lid, let sit for 10 minutes.
  5. Chop cauliflower into delicious bite size pieces

grilled buffalo cauliflower

Step 3: Prep the Blue Cheese Dressing & Salad

Blue Cheese Dressing

  • 1/3 cup mayo
  • 1/3 cup sour cream
  • 1/2 cup blue cheese
  • 1 tsp minced garlic
  • 1 tbsp lemon juice
  • Salt & pepper to taste
  • Add a splash of milk to thin to desired consistency

Salad

  • 4 stalks of celery
  • Equal amount of carrot
  • 1 bunch of green onion (about 7)
  • Sliced Avocado
  • Your choice of greens

grilled buffalo cauliflower

Step 4: Build Your Salad Yo’

Assemble and enjoy! Add more buffalo sauce and finish it off with blue cheese dressing. If you are feeling super sassy throw on some blue cheese crumbles. Yessssssss….

From your yogi in the kitchen,

Christina

Yogis in the Kitchen: Squash Boats

By Yogis in the Kitchen

squash boats

Stuffed Squash Boats

Want to eat more vegetables? How about putting a vegetable INSIDE a vegetable. SO RESOURCEFUL. SO EFFICIENT. SO HEALTHY……and most importantly SO DELICIOUS. Mic drop. Yogis in the Kitchen out.

Ingredients

  • Spaghetti Squash (1 squash per 2 people)
  • Olive Oil
  • Salt
  • Pepper

Directions

  1. Wash your squash, cut off the ends and then cut squash in half lengthwise; scoop out seeds. Lightly oil your baking dish. Then, coat your squash halves in olive oil, salt, pepper. Place squash, cut side down, in baking dish. Bake uncovered at 400 for 35-40 min (depending on the size of the squash.)
  2. Meanwhile, drizzle oil into a skillet and get your veggie or meat stuffing started. (see below for stuffing ideas)
  3. Remove squash from oven and use a fork to create spaghetti like strands.
  4. Transfer veggie/meat mixture into your squash ‘boats’ and top with tomato sauce and your choice of cheese. Place back in the oven for about 3-4 minutes until cheese is melted and heated through. (Using the broiler works great for this part!)

squash boats

Ideas:

Diced up baby portabella mushrooms, sauteed with onions and garlic. Add to spaghetti squash and cover with tomato sauce and cheese!

Diced zucchini sauteed with onions and garlic tossed with pesto sauce and chopped up tomatoes.

Cheers! – Christina

Yogis in the Kitchen: Treats

By Yogis in the Kitchen

Hi Yogis! It’s time for some healthy-ish snacks disguised as dessert.  Decadent truffles (made with dates!) andddd (Phat) Brownies, with avocado!

treats

Delightful Date Truffles

Ingredients
  • 2 cups of almonds, or other seed/nut of choice
  • Pitted dates or baking dates (baking dates are already mashed up which saves you some work in the food processor 😉 )
Mix-in Ideas
  • Unsweetened coconut rolled in cacao
  • Roll the date ball in dried orange, then dried sumac berries and a pinch of sugar
  • Smoky chili powder with chocolate chips
  • Cinnamon chips rolled in Chinese five spice
  • Unsweetened coconut with dried cranberries rolled in cacao powder
Directions
  1. In a food processor, process the nuts until crumbly.  Add in the dates (slowly so you don’t overload your food processor) and process again until sticky, uniform batter is formed.
  2. Scoop out the dough by tablespoons, then roll between hands to form balls.
  3. Time to get your ‘fance’ on.  Roll your date balls in shredded coconut, cacao, or any other combination of nuts and dried fruits that you like. This recipe is easily adaptable!

(Phat) Brownies

IMG_2472 (2)

These brownies are so darn good, *someone* stole a bite before I could get them out of the house.

treats

Ingredients
  • Your favorite brownie mix (We love Ghiradelli Dark Chocolate Brownie Mix)
  • Avocado
  • Raspberry Preserves (if you are feeling fancy)
Directions

Follow the instructions on your favorite brownie mix. Here’s the twist, add in the avocado as you blend up your brownie mix. Yes, an avocado, this will add more good fat (YES, GOOD FAT) to your brownies and make them super dang rich and moist. If you want to do the super fancy raspberry swirl, just spoon on several dollops of the raspberry preserves onto the batter (before you cook it) and run a knife through to make a cool swirly design. Voila! Fancy brownies. Refer to your box of brownies for oven temperature and cooking times. 😉 Eat on my fellow yogis.  Love, Christina

treats